
At DM Crookshanks Copper Roofing, we specialize in repairing and installing copper roofing in Greater Cleveland and Northeast Ohio.

The roof of the bay window attaches to the brick wall just below the sandstone wall band. That is the primary design flaw. The stone is too close to the roof to provide spacing for proper roof and counter flashing.
This entire roof was installed as a standing seam roof, which began leaking shortly after installation. The top section is too flat for standing seams and should have been installed with copper flat panel locked and soldered roof seams. The lower section of pitched, steeper roof is okay and will perform and look better with standing seams.
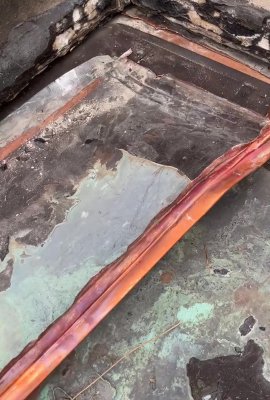
We start by removing the roofing and tar along the sandstone wall band. There is almost an inch and a half of tar, plus numerous caulking applications.


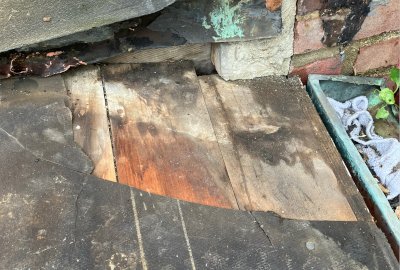
The original roofing mechanics tried to install copper flashing up and under the stone and brick wall, but they could not because the brick had been installed before the roof framing and decking. All they had to work with was an approximate half-inch gap between the wood roof deck and sandstone to install flashing. They then simply slipped the copper sheet roofing under the brick and stone and filled the gap with caulking.


After removing the old copper, we noticed additional signs of leaking at each of the standing seam ridge joints. Water leaked through the broken solder joints and flowed down the roof over the tar paper, fortunately keeping that area leak-free, but then it leaked into the eaves where the tar paper stopped from behind the gutter board. More leaking is observed at the far right corner under the upper roof gutter downspout, along with leaks behind the roof flashing.


We have removed all the old copper, cleaned the roof decking, and secured all loose roof boards and decorative wood trim. A new roofing underlayment has been installed to protect the roof deck and the home's interior from rain while the new roof is being installed. The trim previously supporting the old box gutter has a nicely crafted, rounded edge and is in great shape; it will be reused. Most trim moldings like this are only occasionally, if at all, properly protected from the elements. Most roofers lack the equipment or expertise to properly address this area, which often results in water damage from overflowing rain gutters. We will cover this with a custom-rolled length of copper flashing, with watertight soldered joints.

Once the copper sill cover is installed, we will affix copper drip edging, which will be formed to match the existing pitch of the roof. Gutter hangers/brackets are installed and secured with stainless steel screws at the rafters. Both the sill cover flashing and drip edge are secured using copper nails.

A layer of rosin paper is placed as a slip sheet between the underlayment and the copper to prevent the hot copper from melting and sticking to, the underlayment. Custom-fabricated copper standing seam roofing panels are crafted to fit the roof and secured with stainless steel cleats to allow for movement and accommodate expansion and contraction of the panels. The ends of the standing seam ribs are custom-cut and professionally folded in a double-lock configuration.

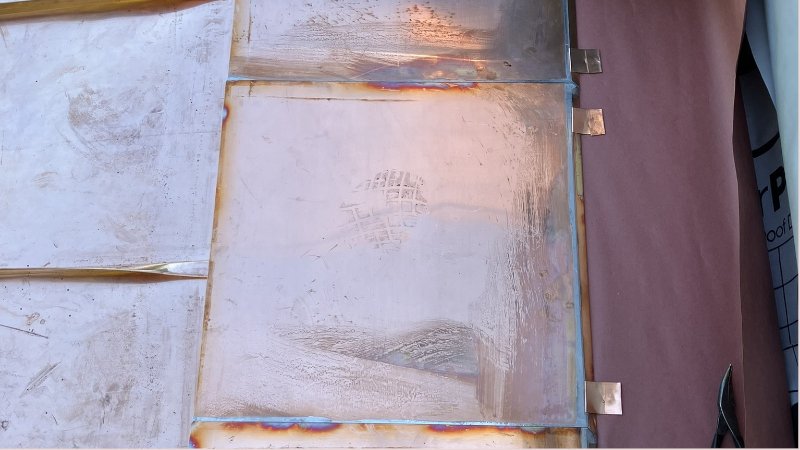
At the top copper flat seam panels will be tailored to fit the flat areas of the roof. Each panel will be pre-soldered at the edge, ensuring optimal flow of solder into the full panel seam. Not pre-soldering could lead to joints with minimal solder at the edge, resulting in premature failure. Panels will be secured with copper roof cleats and nails featuring oversized pre-punched holes to allow for the movement of the copper.

Copper counter flashing is attached to the brick wall. First, a groove, traditionally called a raggle, is cut into the mortar joint above the sandstone. The counter flashing is set into the groove and secured with lead wool. Compatible mortar is installed to finish and seal the flashing.

A new European-style copper gutter and downspout system is expertly installed around the perimeter of the newly constructed copper roof. The gutter features meticulously soldered seams at the corners and downspout outlet, ensuring durability and preventing leaks. Once the installation is complete, a thorough cleaning process is undertaken to remove any debris or dirt that may have accumulated. Soldering flux residue is removed and neutralized, and copper bits and pieces are removed from the surrounding landscape. With these final touches, both the roof and gutter are fully prepared to provide a lifetime of reliable service while enhancing the aesthetic appeal of the property.
